Whenever I went to my aunts and uncles houses as a kid the thing I always enjoyed was playing with the old games they had. I'm thirty six and my Dad was the youngest in his family so some of his brothers and sisters had kids that were 20 years older. This meant a lot of vintage games. This Christmas I decided to start a new tradition for my kids. I would build a vintage game for them each Christmas. The plan is to keep them hidden for most of the year and bring them out around Christmas time so they can rediscover them each year.
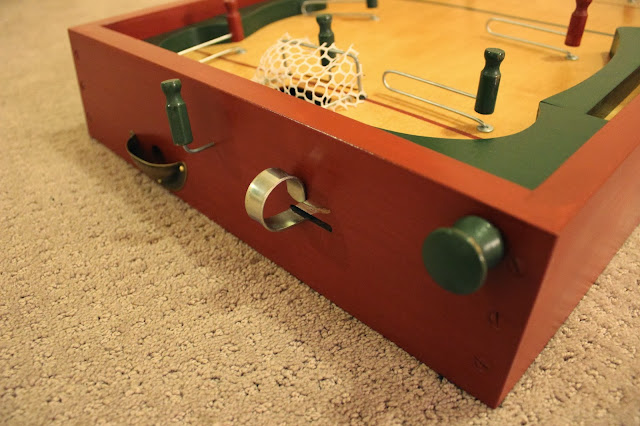
The first project was somewhat complicated but comes as a kit from Lee Valley. It's based on a table hockey game by Monroe and this particular version dates to about the 1950's. The instructions were fairly complete but could definitely have benefitted from a few more pictures which is why I've included multiple views of the finished project in this posting. I searched online and there weren't very many images to be found so hopefully this post helps someone in the future. (Feel free to point out anything I might have gotten incorrect.)
 I kept to the plan for the most part however I made the sides a bit beefier. I want this to last a long time. The finish is milk paint and shellac.
The kids really enjoyed playing with it this year and when they seemed done I tucked it away under a bed for us to find again next year.


This article is what I was looking for! I saw the kit at LeeValley but I wasn't sure how the players move. I first thought they were moved with rotation on the player's peg, individually. Like a babyfoot game, you need to rotate each pole individually. But your blog post shows me the hidden hardware underneath and I found it more attractive for the kids to have the control of all player with just one controller, except for the goaler. I never saw these type of hockey table game as a kid because my father bought me a more modern style with one controller for each player behind the goaler. Your blog post will be very usefull for me thought! Thanks for the detailled photos. I also have a blog like your with woodworking project with a lot of details and pictures and "how-to" steps, but as it is in french, my native language, maybe you'll find it useless but I can share it to you if you are interested, in private email. I don't want to make unwanted publicity here for mine! ;) Thanks again for sharing!
ReplyDeleteI played this game When I was 10 yrs old great game lots of good times
ReplyDeleteCan you tell me what thickness of plywood you used for the playing surface?
ReplyDeleteThanks
1/8 inch Baltic birch. It has to be thin so it bends slightly in the middle. Baltic birch has no voids in any of the layers so it's plenty strong. The bumpers on the sides along with the cleats on the bottom help keep it sturdy. 7 years and we are still using it every winter.
ReplyDeleteI have instructions but not all the parts. Your blog is most helpful. Looks like you used 3/4 on sides as well as ends. Did you use mdf for that?
ReplyDeleteNo MDF. Wanted this to last generations and it's still going strong. I used Maple for the sides. It takes paint well. You could also use poplar.
DeleteThanks so much. I’ll go with maple but leave it natural colour.
Delete